| Importing Clients' Information |
|
Before importing your clients into Client Track, you must export your clients' information
first from one of the software packages listed on the left side of the menu. |
|
| Follow the instructions below on how to export your clients' information into a text/CSV file. |
|
|
|
| Tax Prep T1 I Tax Prep T2 |
|
|
|
| Exporting Clients From Tax Prep T1 |
|
| STEP 1 |
|
| Click the 'Download' link below to save the Tax Prep T1 Export template to your desktop. |
|
|
|
|
The export template will tell Tax Prep how to export the information Client Track needs with the
T1 titles matching with the columns in the correct order. The order of the columns are as shown: |
|
LAST NAME, FIRST NAME, SIN, BIRTH DATE, ADDRESS 1, ADDRESS 2, ADDRESS 3, CITY,
PROV, POSTAL CODE, HOME TELEPHONE, CELL, EMAIL |
|
Note: If you choose to not download this template and instead export from Tax Prep to Excel, the
T1 titles will not
always match with the columns despite that the columns are in the correct order. |
|
| STEP 2 |
|
| Place the saved export Tax Prep T1 template to the following location on your computer: |
|
|
| STEP 3 |
|
 |
|
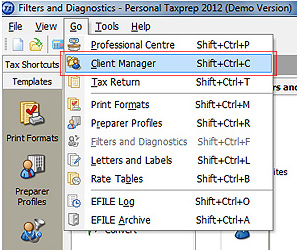
| From the main menu in Tax Prep, go to Go > . |
|
| STEP 4 |
|
 |
|
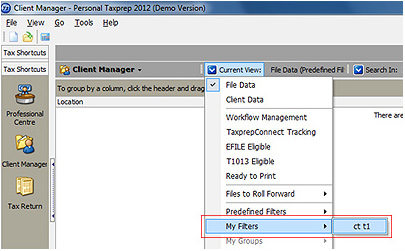
In Client Manager, click and then go to to view the export template
you saved and placed from Steps 1-2. |
|
| STEP 5 |
|
 |
|
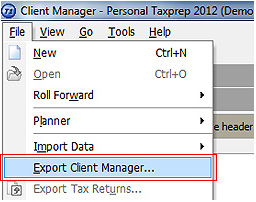
| 1) From the main menu in Tax Prep, go to File > . |
|
| 2) Save the file to your computer and go to Step 6 below. |
|
| STEP 6 |
|
| After export has been finished, click the link below to import file into Client Track. |
|
| > To import text/CSV file into Client Track, click here. |
|
| Exporting Clients From Tax Prep T2 |
|
| STEP 1 |
|
| Click the 'Download' link below to save the Tax Prep T2 Export template to your desktop. |
|
|
|
|
The export template will tell Tax Prep how to export the information Client Track needs with the
T2 titles matching with the columns in the correct order. The order of the columns are as shown: |
|
CORP NAME, CLIENT ID, ADDRESS 1, ADDRESS 2, CITY, PROV, POSTAL CODE, MAIN PHONE,
FAX, EMAIL, YEAR END, BUSINESS NUMBER |
|
Note: If you choose to not download this template and instead export from Tax Prep to Excel, the
T1 titles will not
always match with the columns despite that the columns are in the correct order. |
|
| STEP 2 |
|
| Place the saved export Tax Prep T2 template to the following location on your computer: |
|
|
| STEP 3 |
|
 |
|
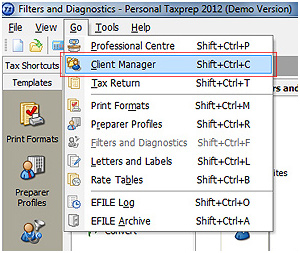
| From the main menu in Tax Prep, go to Go > . |
|
| STEP 4 |
|
 |
|
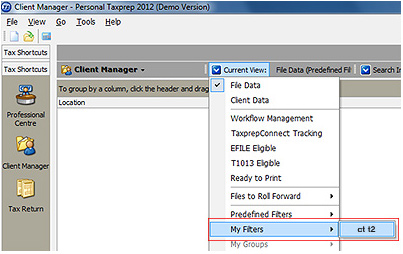
In Client Manager, click and then go to to view the export template
you saved and placed from Steps 1-2. |
|
| STEP 5 |
|
 |
|
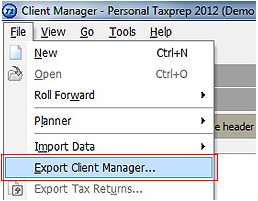
| 1) From the main menu in Tax Prep, go to File > . |
|
| 2) Save the file to your computer and go to Step 6 below. |
|
| STEP 6 |
|
| After export has been finished, click the link below to import file into Client Track. |
|
| > To import text/CSV file into Client Track, click here. |
|