main_tl_corner main_tm_one main_tr_corner
main_tl_side_one
main_canada_flag
client_track_logo
main_tm_four
Home_Button Features_Button Products_Button Downloads_Button Pricing_Button Support_Button
main_tr_side_one
Client Track's 15th Anniversary Header
Free_Trial_Button Buy_License_Button
Support
Importing Clients
Getting Started
Training University
Faqs
Client Track Online Help Centre
Group Demo
Webinar Button
Client Track YouTube Channel
Contact Us
Training University
100s - The Basics  >  Add a New User
Add a New User
Brief Summary
Learn how to add an user and assign specific privileges to user in Client Track.
Step-by-Step Instructions Video Tutorial
Step 1
Users - Manage Users Link
beight_lcorner In menu, go to Users > Manage Users
Step 2
Add New User Link
Click Add New User under List of Users shown above.
Step 3
Add New User (Name)
1) Enter in full and display names of user shown above.
2) Click Finish to save added user.
Note: New user(s) appears under List Of Users category.
Step 4
View User Privileges Link
1) Select added user from List of Users category.
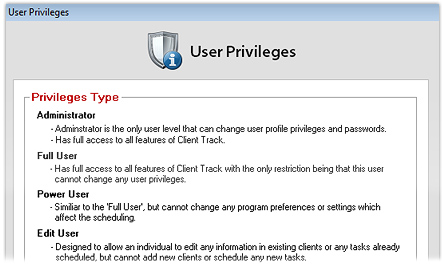
2) Click View Information on User Privileges.
User Privileges Descriptions
3) Read over the user privileges to determine which privilege is right for user.
4) Click Close to exit User Privileges and select a privilege from list.
Step 5
User Password
1) For adminstrator of Client Track within office, enter new and verify new password
    and then click Set Password (Enable Password Protection will automatically
    be checked off).
2) Click Ok to complete added user.
Note: Only administrator has rights to change user privileges. To change the password,
click Change Password to enter in new password.
Video Tutorial
telephone E-Mail Button
hours
main_bl_corner main_bm_four main_br_corner
Copyright  © 1999 - Present, Trilobyte Solutions Inc. All Rights Reserved. Website created by Jason Medeiros.